Tutorial: Setting up a Custom date scale
Adding a Custom date scale to your PowerGantt Chart
Now every user of the PowerGantt Chart can also define and include their own custom scale date. Adding a custom scale date to your PowerGantt Chart allows you to visualize project timelines and tasks more effectively. A custom scale date provides greater flexibility and precision in representing project schedules because there are unlimited number of custom date/time scales, like: fiscal years, special weeknumbers, AM/PM split of the day, etc..
In this article, you will find step-by-step instructions on how to achieve this.
Try it yourself!
Here’s what you need to define and set up a Custom scale date:
– a Power BI report with your Dataset (including task names, start dates, end dates, etc. )
– a Dataset with a date or time table
– Link tables
– Build and Format the PowerGantt Chart
– Save and Share
1. Create a Date Table
A custom date table is essential for implementing a custom date scale. This table will include all the dates you want to display on the Power Gantt Chart. You can generate a date table with DAX or Power Query.
Your date table should have: a date column, unique values, no BLANKs and no missing dates.
1.1 Using DAX
To work with DAX, you must have at least one date table in your model. A date table is a table that meets the following requirements:
- It must have a column of data type date (or date/time).
- The date column must contain unique values (dates should appear once).
- The date column must not contain BLANKs (needs to have valid dates).
- The date column must not have any missing dates.
- The date column must span full years. A year isn’t necessarily a calendar year (January-December).
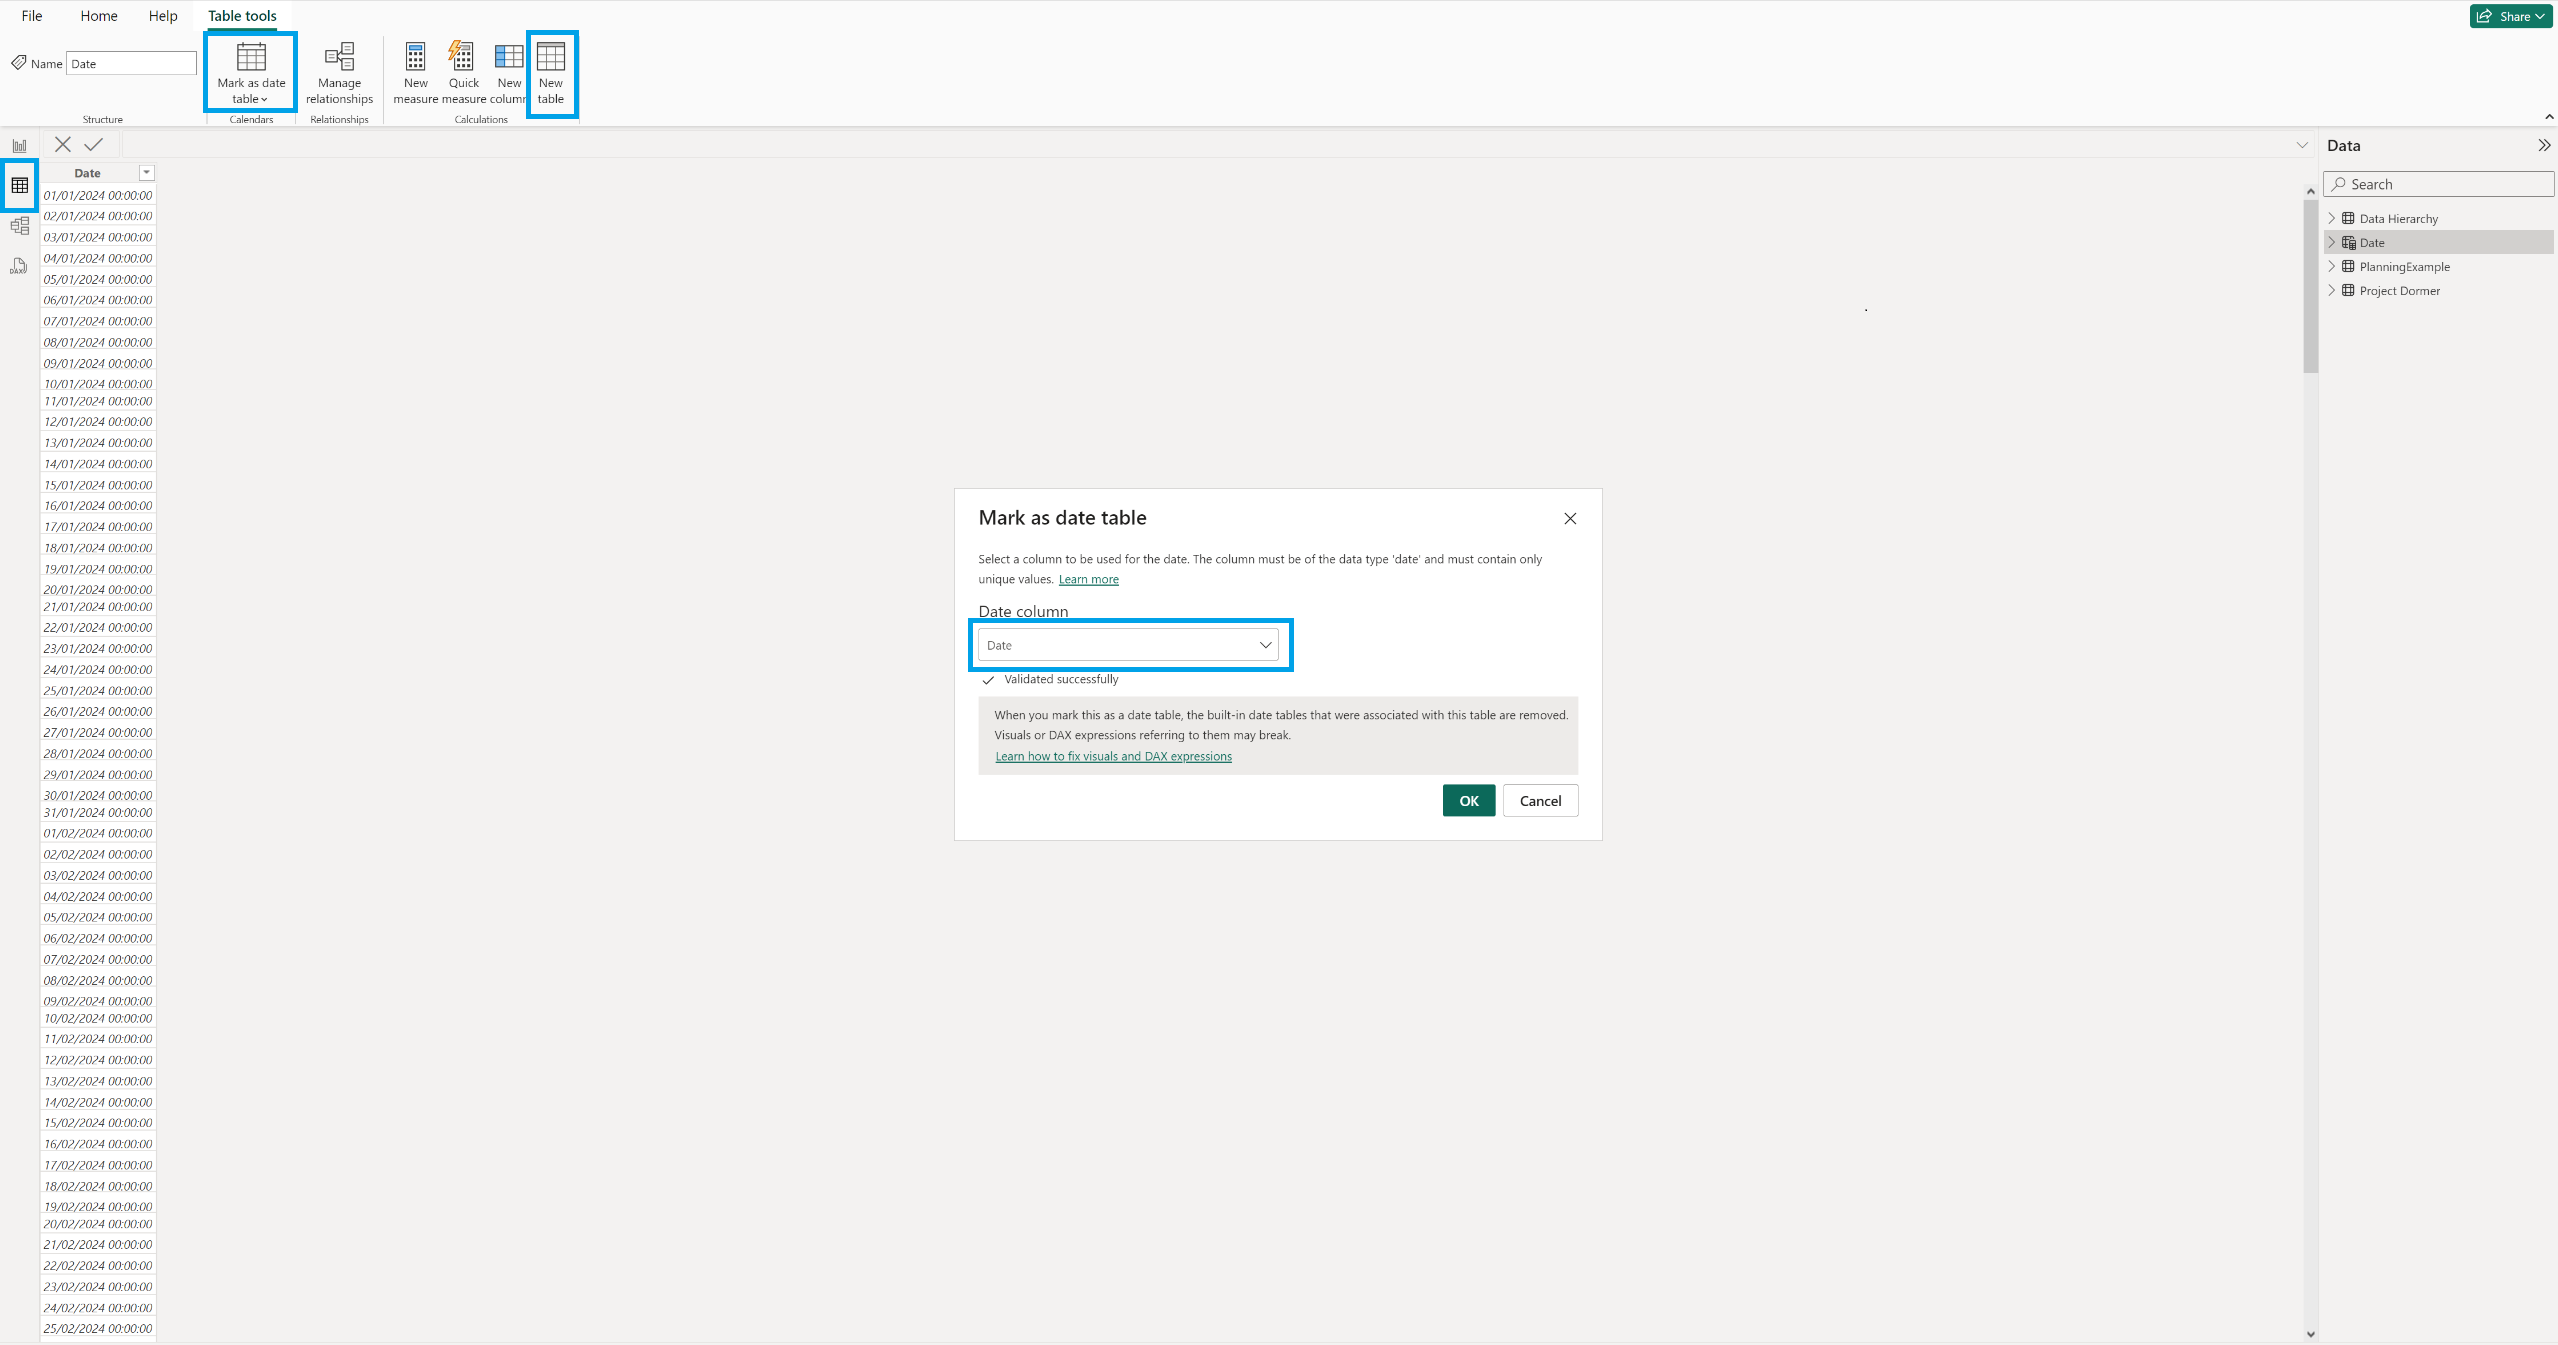
- The date table must be marked as a date table.
- Click the Table view icon from the left menu or the Modeling tab from the top menu
- Click New Table
- Rename your new table
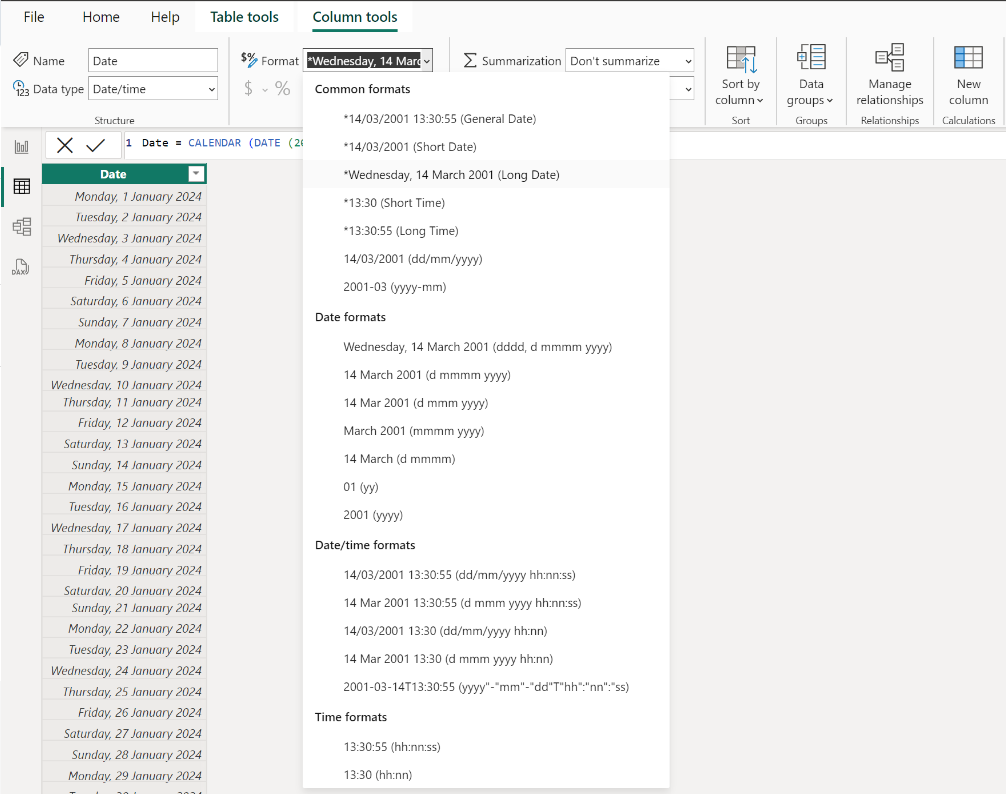
- Enter the DAX expressions to create a date table and press Enter
- Optionally, select the Column and update the Format
- In the Data pane, right-click on it and Mark as date table.
You have generated a date table with DAX, now you need to build a relationship between your dataset and the date table. Go to section 2. Link Tables
1.2 Using Power Query editor
- Click Table view icon from the left menu
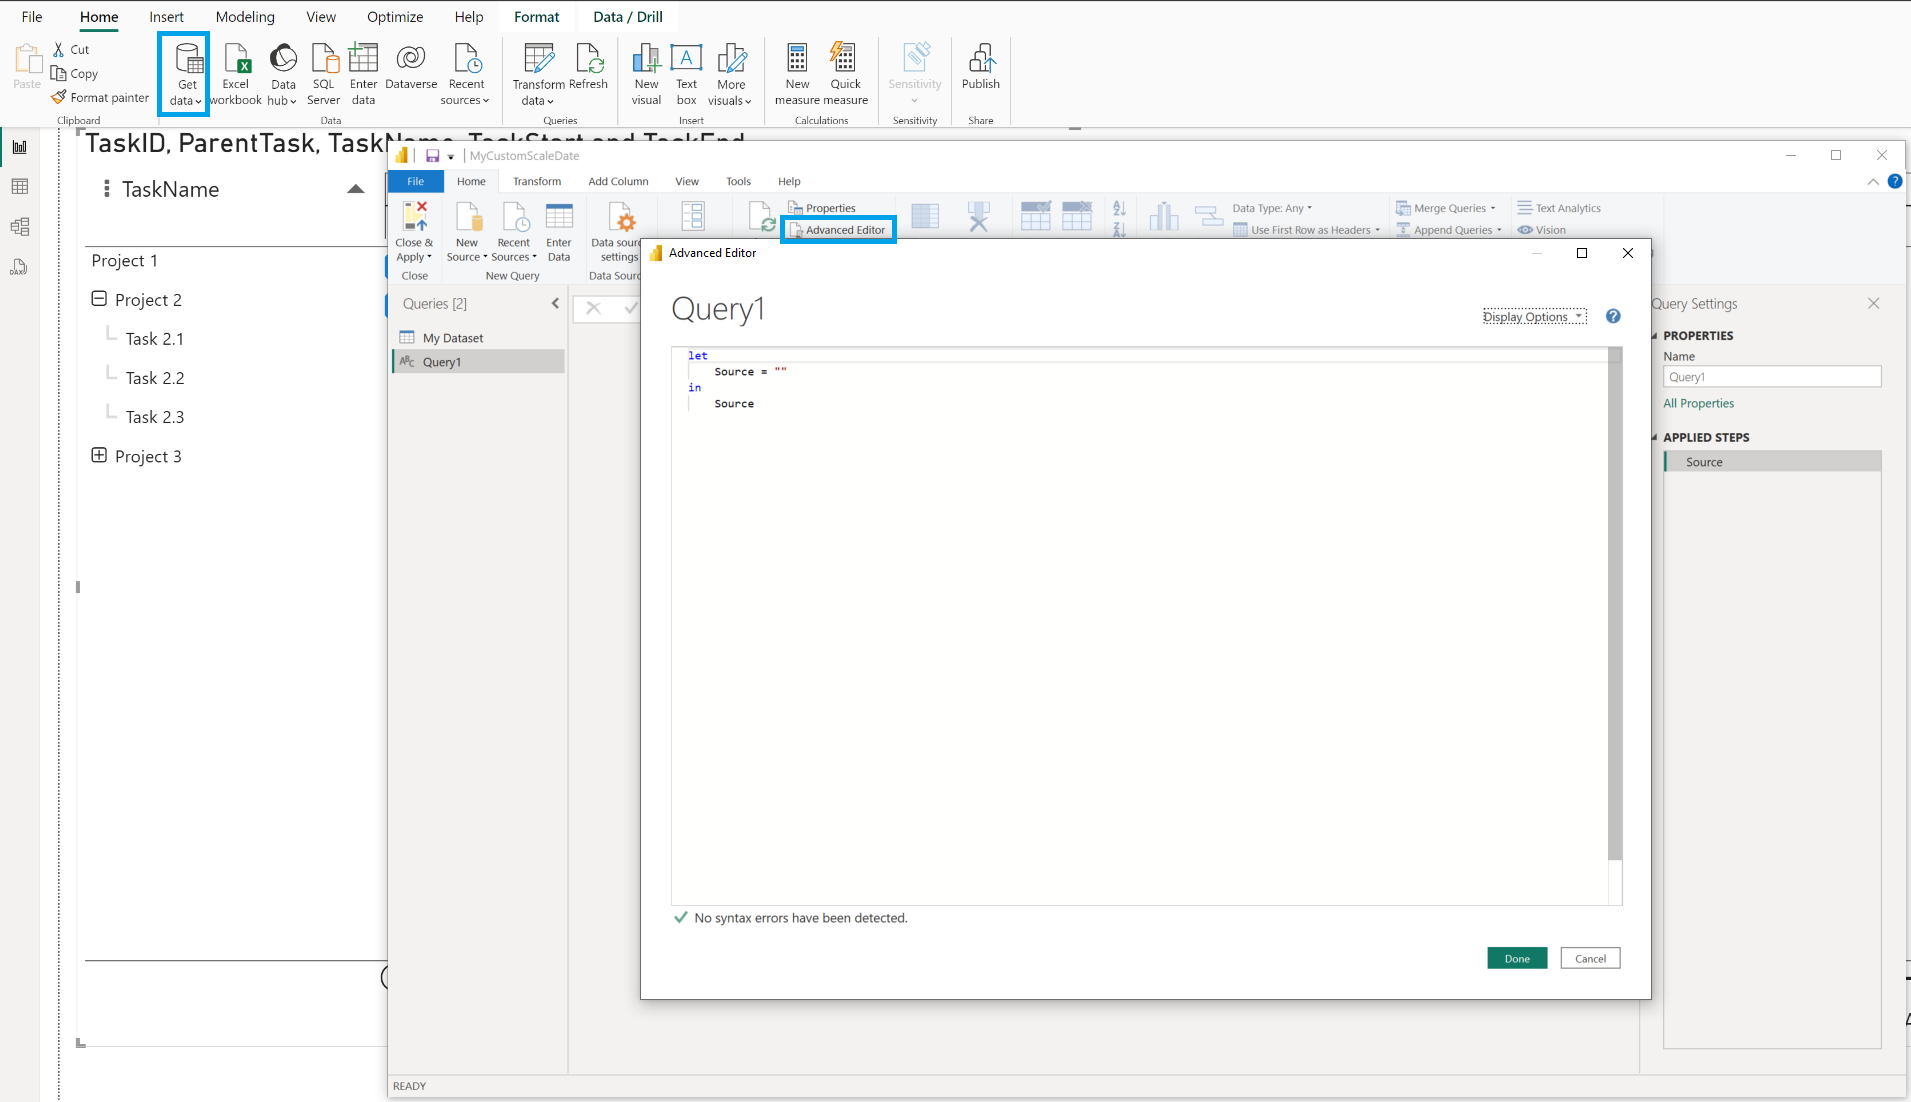
- Click Get Data and select Blank query from the drop-down menu
- Select Advanced Editor
- Enter the Power Query M functions to create a date table and click Done
- Rename query
- Close & Apply.
If you add only a calendar table, convert it To Table in the Convert menu on the ribbon. Click OK in the next menu (no selection needed). After converting the list to a table, rename the column to “Date” and right-click and select Change Type > Date.
If your organization has already a global date table in the source data, you can use Power Query to connect to the date table.
You have generated a date table with Power Query, now you need to build a relationship between your dataset and the date table.
2. Link Tables
Connect the newly created date table with your existing dataset based on the date fields. You need to establish a relationship between the date table and the date fields in your dataset.
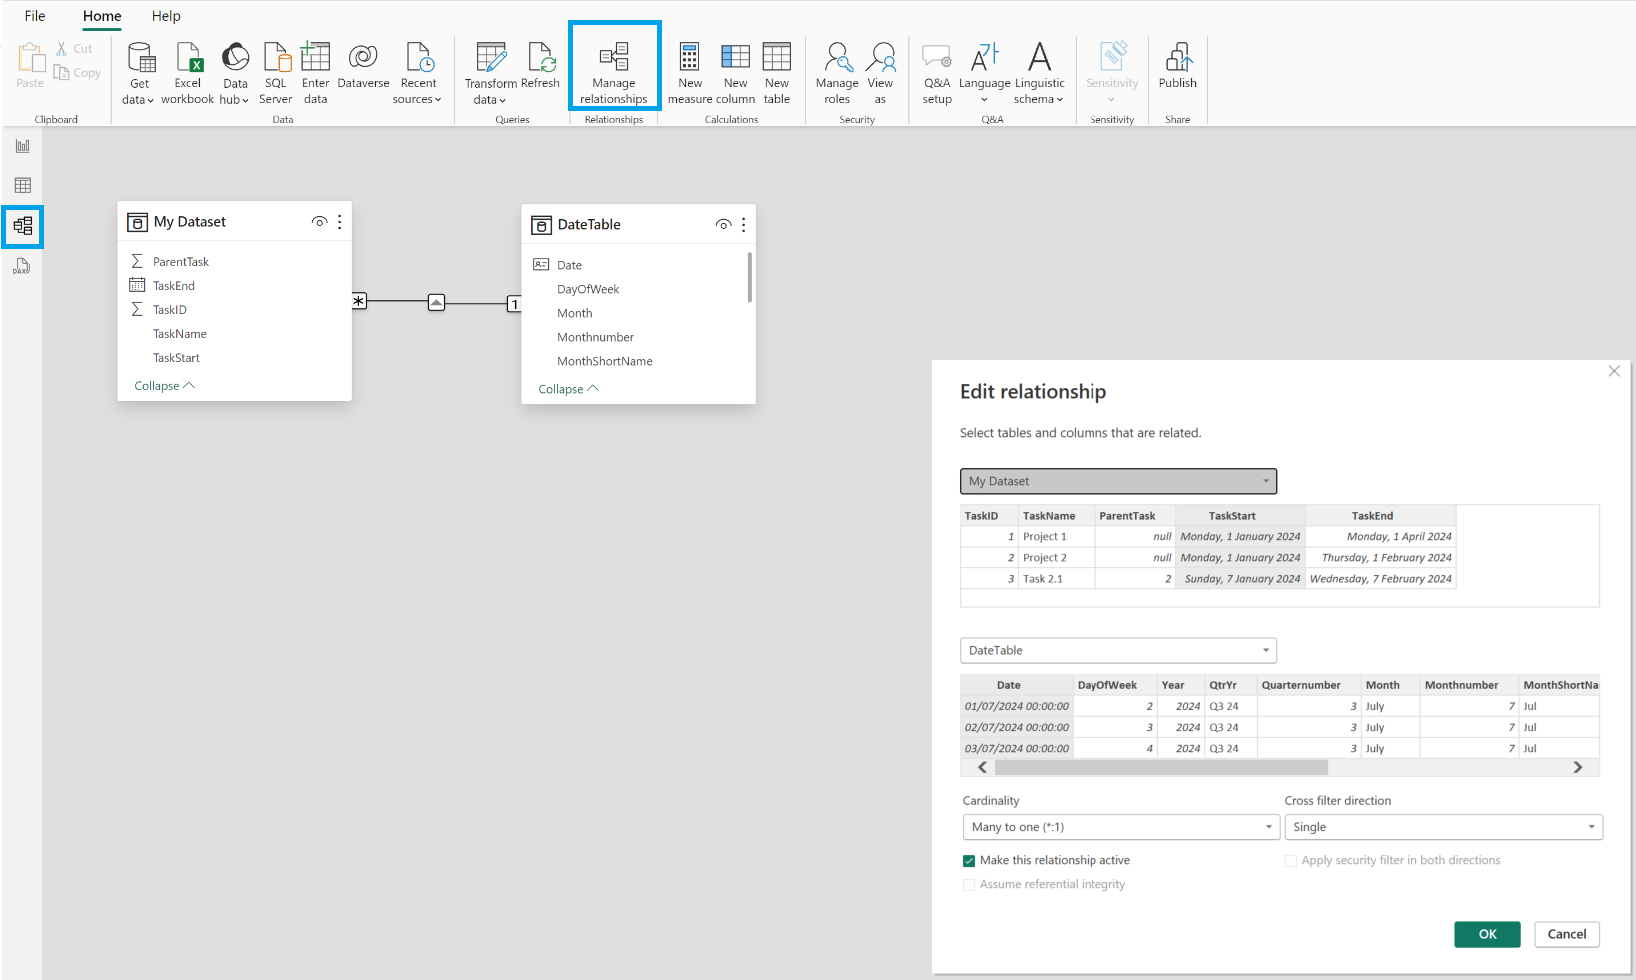
- Click Model view from the left menu
- Click on the Manage relationships from the top menu
- Click New…
- From the first drop-down, select your Dataset table and select a column with dates (for example the Start date)
- On the next drop-down, select the Date table you just created and select the Date column
- By default Cardinality is set to Many to one (*:1)
- By default the Cross filter direction is Single
- Press OK and Close buttons.
Your date table is now linked to your dataset.
3. Build visual
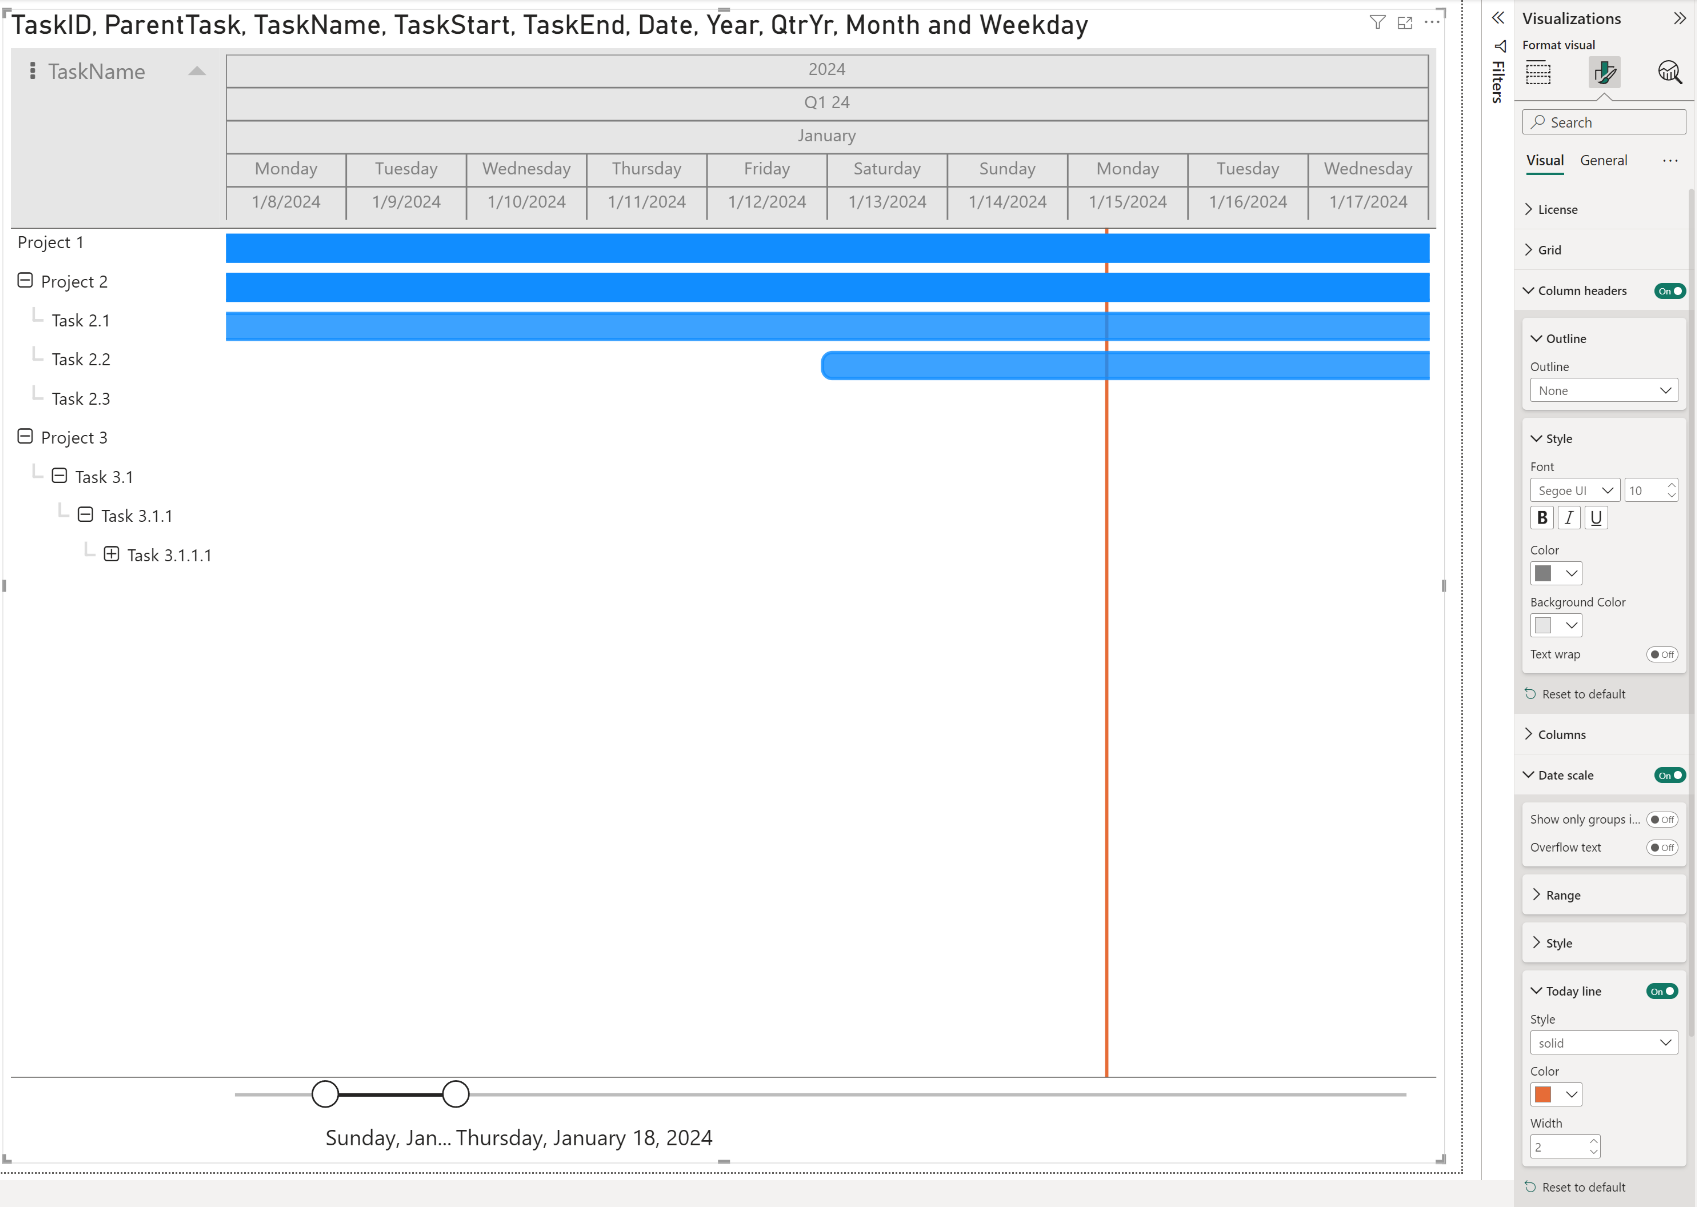
Add a PowerGantt Chart to your report and use the Custom scale date.
- In Power BI, open or locate the report with the PowerGantt visual
- Add categories to the fields (Item, Parent, Item Name, Start date, End date,…)
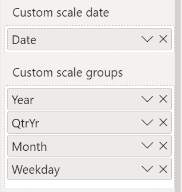
- Add the Date category to the Custom scale date
- Add categories to the Custom scale groups
- Right-click on each category in the Custom scale date and Custom scale group fields, make sure to click/select Don’t summarize and Show items with no data.

4. Format visual
Take advantage of the additional formatting features available for the Date scale in the formatting pane and customize it according to your preferences.
Go to Format visual pane and expand the Date scale card to:
- Enable or disable the Date scale.
- Show only groups in custom scale option.
- Enable Overflow text.
- Set a Start and End Date Range.
- Style your date scale by setting the Font family, text Size and emphasized text (Bold, Italic, Underline).
- Enable or disable the Today line and change the Style (solid, dotted, dashed), Color and Width of the line.
Additionally, change the Color and Background color of the Date scale under the Column headers card.
Save your Power BI report and publish it to the Power BI service.
Additional information
For good design practices to create date tables in your data models when using Power BI Desktop, see Create date tables in Power BI Desktop in the Microsoft Learn platform.
There are several reference materials and guides available for DAX and M Query, that can help you to define your custom date.
Data Analysis Expressions (DAX) Reference: https://learn.microsoft.com/en-us/dax/
DAX Guide: https://dax.guide/
CALENDAR DAX Function
Date = CALENDAR (DATE (2024, 1, 1), DATE (2024, 12, 31))DAX Sample used in screenshots
DateTable =
VAR StartDate = DATE(2024, 1, 1)
VAR EndDate = DATE(YEAR(TODAY()), 12, 31)
RETURN
    ADDCOLUMNS (
        CALENDAR (StartDate, EndDate),
	"Year", YEAR([Date]),
        "QtrYr","Q" & FORMAT([Date], "Q YY"),
    	"Quarternumber", QUARTER([Date]),
    	"Month", FORMAT([Date], "MMMM"),
    	"Monthnumber", MONTH([Date]),
    	"MonthShortName", FORMAT([Date], "MMM"),
    	"Weekday", FORMAT([Date], "dddd"),
    	"Weeknumber", WEEKNUM([Date],1),
    	"WeekdayShortName", FORMAT([Date], "ddd"),
    	"DayOfWeek", WEEKDAY([Date]),
    	"WeekdayStartMonday", WEEKDAY([Date],2)
    )
Power Query M formula language: https://learn.microsoft.com/en-us/powerquery-m/
Power Query M formula language: https://learn.microsoft.com/en-us/powerquery-m/power-query-m-function-reference
M Query Samples
= List.Dates(#date(2024,1,1),365,#duration(1,0,0,0))let
Source = List.Dates(#date(2024,1,1),365,#duration(1,0,0,0)),
#"Converted to Table" = Table.FromList(Source, Splitter.SplitByNothing(), null, null, ExtraValues.Error),
#"Renamed Columns" = Table.RenameColumns(#"Converted to Table",{{"Column1", "Date"}}),
#"Changed Type" = Table.TransformColumnTypes(#"Renamed Columns",{{"Date", type date}}),
#"Inserted Year" = Table.AddColumn(#"Changed Type", "Year", each Date.Year([Date]), Int64.Type),
#"Inserted Month" = Table.AddColumn(#"Inserted Year", "Month", each Date.Month([Date]), Int64.Type),
#"Inserted Quarter" = Table.AddColumn(#"Inserted Month", "Quarter", each Date.QuarterOfYear([Date]), Int64.Type),
#"Inserted Week of Year" = Table.AddColumn(#"Inserted Quarter", "Week of Year", each Date.WeekOfYear([Date]), Int64.Type),
#"Inserted Day Name" = Table.AddColumn(#"Inserted Week of Year", "Day Name", each Date.DayOfWeekName([Date]), type text)
in
#"Inserted Day Name"