Tutorial: Adding a PREMIUM License Manually or via a Theme file
This guide explains how to apply a PREMIUM license to your Nova Silva Power BI visual: either manually through the Power BI interface or automatically using a Power BI theme file.
License Options
You have two methods to activate the PREMIUM license for your visual:
- Manual License Entry: Enter the license details directly in Power BI Desktop.
- Theme File License: Add your license to a Power BI theme JSON file so it applies automatically to all visuals in your report.
New
Power BI: Organizational Themes Support (Preview)
Microsoft has added preview support in Power BI for Organizational Themes, allowing administrators to define a shared theme for all users. This organizational theme can include the license information for Nova Silva visuals, simplifying license management.
Learn how to configure this in our blog post: Use Organizational Themes to manage your License in Nova Silva visuals
Adding the License Manually
To apply the license manually within Power BI Desktop:
- Open your report in Power BI Desktop.
- Add the Nova Silva visual to the report canvas, if it’s not already there.
- Select the visual on your report canvas to activate it.
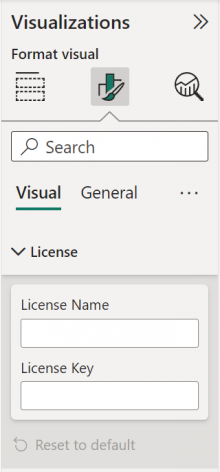
- In the Visualizations pane, click the Format visual icon.
- Expand the License card.
- Paste the License Name and License Key exactly as provided in your email.
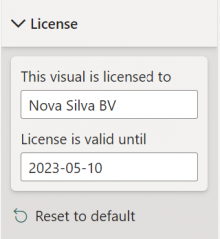
- If entered correctly, the license’s expiration date will appear, confirming successful activation.
- Save your report and Publish it to the Power BI Service.
For a scalable approach across reports, consider using a Theme file to automate license activation. You can find detailed instructions in the next section.
Adding the License via a Theme File
Using a theme file allows you to apply a PREMIUM license automatically to Nova Silva visuals, avoiding manual entry for each visual or report.
Why Use a Theme File?
Power BI Themes are defined in so called JSON files. By including your license information in the theme’s visualStyles section, the license will be applied to all Nova Silva visuals used within that report.
Steps to Add License in a Theme File
- Create or edit a JSON theme file.
- Add a
visualStylesblock with your license info (see example below). - Save the file with a
.jsonextension (e.g., LicenseTheme.json). - In Power BI Desktop:
- Open a new or existing report that includes the Nova Silva visual.
- Go to the View tab.
- Click the Themes drop-down and select Browse for themes.
- Locate and open your saved “LicenseTheme.json” file.
- A File successfully added confirmation will appear. Click Got it.
- Your report will now include the license information automatically.
- Save and Publish your report to the service.
If your organization already uses a corporate theme, simply insert the visualStyles section into that existing JSON file. The license will then apply consistently across all related reports using that theme.
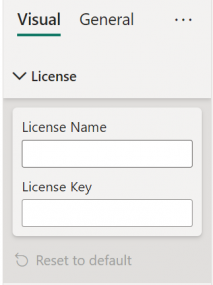
Use this approach when the visual has never been licensed before and the License card is empty.
After the license has been successfully applied via a theme, future license updates will be picked up automatically by re-importing the updated theme.
License properties
UI Field (Power BI)
License Name
License Key
JSON Property
"licenseName"
"licenseName"
Theme File License Example
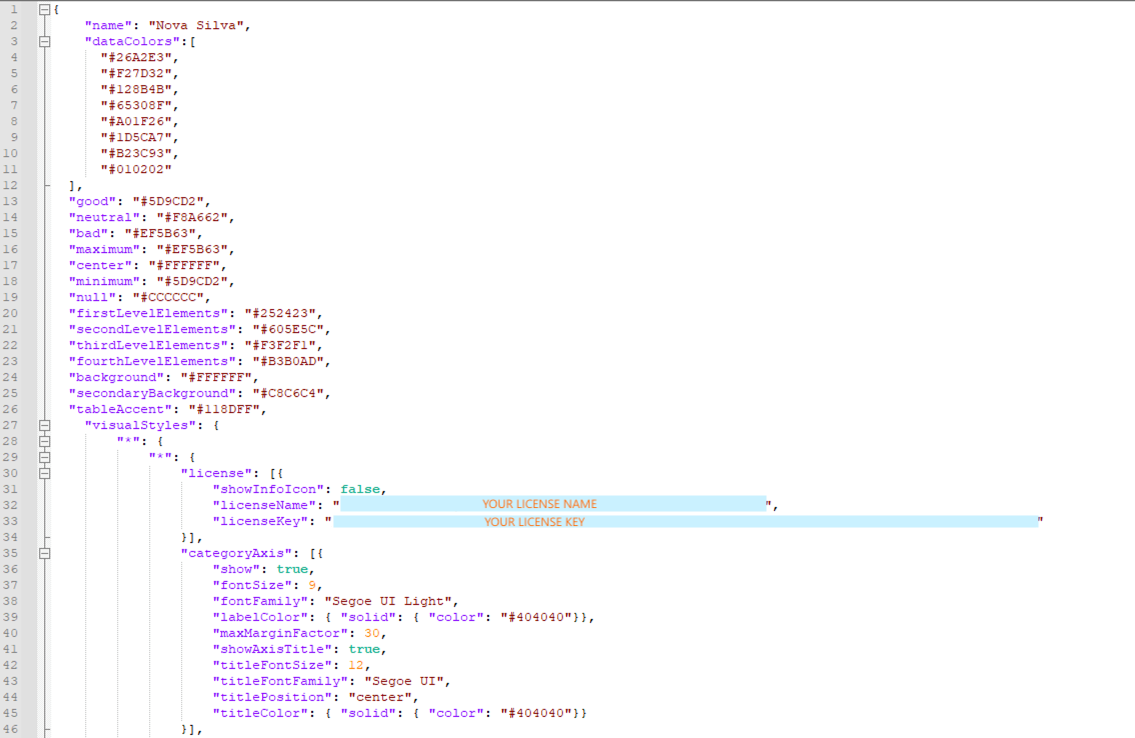
Below the code to include in your theme JSON file.
Replace "YOUR LICENSE NAME" and "YOUR LICENSE KEY" with the license information provided in your email.
Always copy and paste your license credentials exactly as received in the email, mistakes will prevent activation.
"visualStyles": {
       "*": {
          "*": {
             "license": [{
                 "licenseName": "YOUR LICENSE NAME",
                 "licenseKey": "YOUR LICENSE KEY"
            }]
        }
    }
}
Updating Existing Licensed Visuals
When you renew your subscription, you will receive a new license name and key. If your visuals are already licensed via a theme, simply update the License theme file with the new values, reimport the theme, then save and publish the report.
If a license was previously entered manually, Power BI does not overwrite existing visual-level settings when a theme is applied. The stored license values must be cleared first. You can reset the license by clicking Reset to default in the License card, this must be done per visual. Or if you have multiple visuals or reports, follow the steps below.
This is a one-time process required only when migrating from manually entered licenses to theme-based licensing.
Step 1: Clear Existing License Values (One-Time Action)
- Open your existing License theme JSON file.
- Add or update the
visualStylesblock, leaving the licenseName and licenseKey empty:
"visualStyles": {
       "*": {
          "*": {
             "license": [{
                 "licenseName": "",
                 "licenseKey": ""
            }]
        }
    }
}- Save the file.
- In Power BI Desktop:
- Go to View → Themes → Browse for themes.
- Import the updated theme.
This clears the License card for all affected Nova Silva visuals.
Step 2: Apply the License via Theme
- Update the same License theme file again, replacing the empty values with your valid license:
"visualStyles": {
       "*": {
          "*": {
             "license": [{
                 "licenseName": "YOUR LICENSE NAME",
                 "licenseKey": "YOUR LICENSE KEY"
            }]
        }
    }
}- Save the file.
- Re-import the updated theme into Power BI Desktop.
- Select a visual and confirm the license expiration date appears.
- Save and Publish the report to the service.
Important Notes
- Themes must be re-imported after every change.
- License Name and License Key are case-sensitive.
- Avoid mixing manual license entry and theme-based licensing.
This process is required only once when migrating from manually entered licenses to theme-based licensing.
After the license has been successfully applied via a theme, future license updates will be picked up automatically by re-importing the updated theme, no manual resets are required.
We strongly recommend testing this approach in a test or development report before applying it to production.
Troubleshooting
Confirm License Activation
- Select the visual and open the License section.
- If the license is applied correctly, you will see:
- This visual is licensed to
- License is valid until
If no expiration date appears, the license has not been applied.
If the license has not been applied, especially when using a theme file, review the following common issues:
1. Incorrect JSON Structure
- The
licenseblock must be placed exactly under:visualStyles > * > * - Any misplaced brackets or nesting errors will cause Power BI to ignore the license.
- Tip: Validate your JSON using a JSON validator before loading it into Power BI.
2. Errors in License Details
- License Name and License Key are case-sensitive.
- Extra spaces (especially at the beginning or end) will prevent activation.
- Fix: Copy and paste the values directly from the license email.
3. Power BI Desktop vs Power BI Service
- Licenses are validated at runtime in Power BI Desktop and Power BI Service.
- Fix: Always save and publish the report after applying or changing the license.